Table of Contents
- Introduction to Docker
- How Containers Work Under the Hood
- Docker Virtualization vs Other Virtualization Strategies
- The Core Workflow: Dockerfile to Image to Container
- Everyday Commands
- Data, Ports, and GPUs
- Common Pitfalls and Good Habits
- Where Docker Fits in an ML Workflow
- Resources
If you have ever handed a model or analysis to a colleague and heard “it doesn’t run on my machine”, you have already met the problem Docker solves. Python versions drift, system libraries differ, a requirements file misses one transitive dependency, and suddenly the notebook that worked perfectly on your laptop fails in production or on a teammate’s machine. Docker fixes this by packaging your code together with the exact environment it needs, so the thing you tested is the thing that runs everywhere else.
This post is a practical introduction aimed at people who build models more often than they build infrastructure: data scientists, ML engineers, statisticians, and anyone else who touches Docker occasionally rather than daily. We will cover what Docker actually is, how containers work under the hood, how they compare to virtual machines, and then get hands-on: writing a Dockerfile for a typical data science project, the everyday commands you will actually use, and the gotchas (data, ports, GPUs, image size) that tend to bite newcomers.
Introduction to Docker
Docker first launched in 2013 and can be thought of as part of an open-source ecosystem (Docker Compose, Kubernetes, and friends form the larger ecosystem) which at its core focuses on making applications easy to run, deploy, and scale.
This is done by leveraging the concept of containers: lightweight, isolated, and easily portable bundles of everything necessary to run an application or workflow. Two terms carry most of the weight here, and keeping them straight makes everything else easier:
- An image is the packaged bundle itself: your code, a Python interpreter, libraries, system dependencies, and configuration, frozen into a single shippable artifact. It is a read-only blueprint.
- A container is a running instance of an image. You can start many containers from the same image, the same way you can create many objects from one class definition.

Note: Containers had been around for a while before Docker (Linux features like namespaces and cgroups, and earlier systems like LXC, predate it). Docker’s contribution was making the technology genuinely easy to use: a simple file format for defining environments, a one-line command to run them, and a public registry for sharing them. That usability is what got everyone excited and using containers extensively.
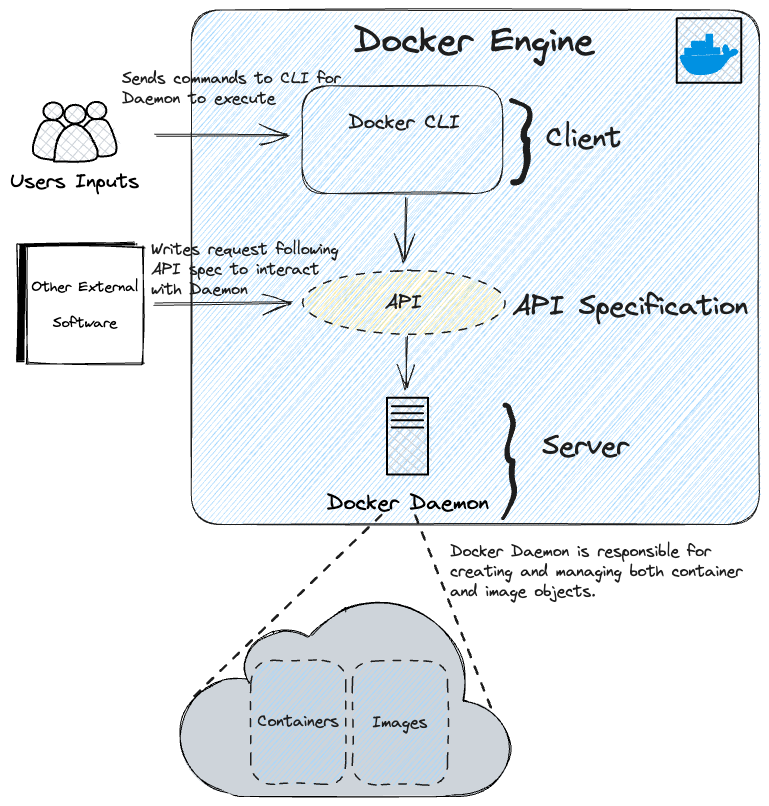
A core part of Docker is the Docker Engine, which consists of a client-server design:
- The Docker CLI (client) is the
dockercommand you type in your terminal. - The Docker daemon (server,
dockerd) is a background process that does the actual work: building images, starting and stopping containers, and managing networks and storage. The CLI talks to it over a REST API. - A registry (Docker Hub by default) is where images are stored and shared, playing a similar role for images that GitHub plays for code.
docker pulldownloads an image from a registry;docker pushuploads one.
How Containers Work Under the Hood
A container feels like a small, separate machine, but it is really just an ordinary process on the host with a restricted view of the world. Three Linux kernel features do the heavy lifting:
- Namespaces control what a process can see. A container gets its own process tree, network interfaces, hostname, and filesystem mounts, so from the inside it looks like it has a machine to itself.
- Control groups (cgroups) control what a process can use, capping CPU, memory, and I/O so one container cannot starve the rest of the host.
- Union filesystems make images cheap to store and share. An image is not one big blob but a stack of read-only layers, where each instruction in your Dockerfile adds a layer. When a container runs, Docker adds a thin writable layer on top; the underlying image layers are shared, unchanged, across every container using them.
That layered design has a very practical consequence: build caching. If you rebuild an image and a layer’s inputs have not changed, Docker reuses the cached layer instead of rebuilding it. We will exploit this deliberately when we write a Dockerfile below, because ordering your instructions well is the difference between a two-second rebuild and re-installing every package on each code change.
Note: These are Linux kernel features, so on macOS and Windows, Docker Desktop quietly runs a lightweight Linux virtual machine and runs your containers inside it. Day to day you rarely notice, but it explains why file access between your Mac and a container can be slower than on native Linux.
Docker Virtualization vs Other Virtualization Strategies
You don’t need containers to isolate applications. The notable alternative is the virtual machine, which virtualizes an entire computer, hardware included, and runs a complete guest operating system on top. The choice usually depends on the problem at hand; the table below compares the two across the areas that matter most.
| Dimension | Containers | Virtual machines |
|---|---|---|
| What is virtualized | The OS: processes share the host kernel | The hardware: each VM runs a full guest OS |
| Startup time | Milliseconds to seconds | Minutes |
| Typical size | Tens of MBs to a few GBs | GBs to tens of GBs |
| Resource overhead | Low; no duplicate OS per instance | Higher; every VM carries its own OS |
| Isolation strength | Good, but shares the host kernel | Strong; hardware-level separation |
| Portability | Very high; runs anywhere with a container runtime | Lower; images are bulky and hypervisor-specific |
| Best suited for | Microservices, CI/CD, reproducible ML and data science environments, fast scaling | Strong isolation needs, running a different OS, monolithic legacy apps |
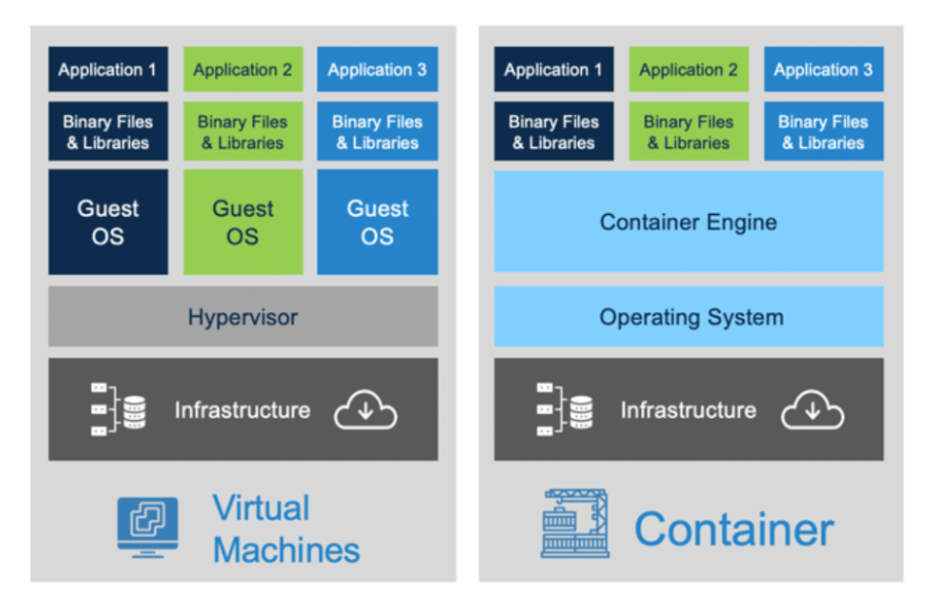
The two are complementary rather than competing: cloud providers typically run your containers inside VMs, using VMs for hard security boundaries between customers and containers for fast, cheap packaging within them.
The Core Workflow: Dockerfile to Image to Container
The typical workflow has three steps. First, you create your application and identify the dependencies required for it to run; for data science applications that means your Python files, requirements file, Python version, and any additional config files or system libraries. Second, you write these down in a Dockerfile, a plain-text recipe for building your environment. Third, you build the Dockerfile into an image, and run the image to create a container.
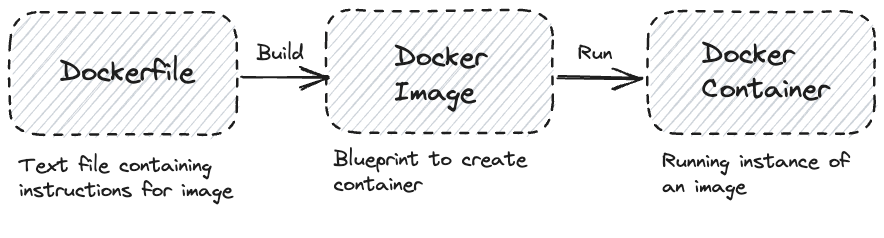
The mental model worth internalizing:
Dockerfile  --(docker build)-->  Image  --(docker run)-->  Container
  recipe                        blueprint                 running instance
A Worked Example for Data Science
Here is a realistic Dockerfile for a typical Python project, say a training script with a requirements.txt:
# Start from an official slim Python image
FROM python:3.11-slim

# All subsequent commands run from this directory inside the image
WORKDIR /app

# Copy ONLY the requirements file first, then install dependencies.
# This layer is cached and only rebuilt when requirements.txt changes.
COPY requirements.txt .
RUN pip install --no-cache-dir -r requirements.txt

# Now copy the rest of the project code
COPY . .

# Default command executed when a container starts
CMD ["python", "train.py"]
Build it into an image and run it:
# Build an image from the Dockerfile in the current directory (note the dot)
docker build -t churn-model .

# Run it; --rm cleans the container up when it exits
docker run --rm churn-model
The ordering in this file is deliberate. Dependencies change rarely; code changes constantly. By copying requirements.txt and running pip install before copying the rest of the code, the expensive install layer stays cached across rebuilds, and editing your training script triggers only a near-instant re-copy of the code layer. Flip the order (a very common beginner mistake) and every one-line code change re-installs every package.
Dockerfile Instructions Worth Knowing
The main instructions you will encounter:
FROM- Specifies the starting (base) image. Official images like
python:3.11-slimare the usual choice; ML images likepytorch/pytorchcome with the heavy lifting pre-installed.
- Specifies the starting (base) image. Official images like
RUN- Executes shell commands at build time, baking the result into the image.
- Chain related commands with
&&and split long lines with\so they form one cached layer, e.g.RUN apt-get update && apt-get install -y git.
COPY- Copies files from your local filesystem (the build context) into the image.
WORKDIR- Sets the working directory for subsequent instructions and for the running container. Prefer it over sprinkling
cdintoRUNcommands.
- Sets the working directory for subsequent instructions and for the running container. Prefer it over sprinkling
ENV- Sets environment variables that persist in the running container.
EXPOSE- Documents which port the application listens on (actually publishing the port happens at run time with
-p).
- Documents which port the application listens on (actually publishing the port happens at run time with
CMDandENTRYPOINT- Define what runs when the container starts.
CMDprovides a default that is easy to override at the command line (docker run image python evaluate.pyreplaces it), whileENTRYPOINTis fixed and treats extra arguments as parameters. For most data science images, aCMDis all you need.
- Define what runs when the container starts.
Tip: Add a
.dockerignorefile (same idea as.gitignore) listing things likedata/,.git/,venv/, and__pycache__/. OtherwiseCOPY . .drags your entire dataset and git history into the image, making builds slow and images enormous.
Everyday Commands
You interact with the Docker daemon through a fairly small set of shell commands. Grouped by what you are trying to do:
Running and Managing Containers
# Create and start a container from an image
docker run <image-name>

# Run with an interactive shell in the started container
docker run -it <image-name>

# Run in the background (detached)
docker run -d <image-name>

# Run and assign the container a particular name
docker run --name <container-name> <image-name>

# Run and automatically remove the container when it exits
docker run --rm <image-name>

# Open a shell inside an already-running container (invaluable for debugging)
docker exec -it <container-name> /bin/bash

# Stop a running container
docker stop <container-name>

# Remove a stopped container (it still occupies disk space until you do)
docker container rm <container-id/container-name>
Inspecting What Is Happening
# List running containers
docker ps

# List all containers, including stopped ones
docker ps -a

# Find a particular container by name
docker ps -f "name=<container-name>"

# Check output generated from a container
docker logs <container-id>

# Follow live output from a container
docker logs -f <container-id/container-name>

# Low-level detail about a container or image (mounts, env vars, network)
docker inspect <container-name>
Working with Images
# Build an image from the Dockerfile in a directory
docker build /path/to/project

# Build an image with a specific name (tag)
docker build -t <image-name> /path/to/project

# View the images available on your machine
docker images

# Remove an image (only works if no containers are using it)
docker image rm <image-name>

# Save an image to a file
docker save -o image.tar image-name:v1

# Load in a saved image file
docker load -i image.tar
Registries: Pulling and Pushing
# Pull the latest image from Docker Hub
docker pull <image-name>

# Pull a specific version of an image
docker pull <image-name>:<image-version>

# Pull from a private registry
docker pull dockerhub.myprivateregistry.com/image_name

# Tag your own image for a private registry and push it
docker tag <image-name> dockerhub.myprivateregistry.com/image_name
docker image push dockerhub.myprivateregistry.com/image_name

# Log in to your private registry
docker login dockerhub.myprivateregistry.com
Note: An image reference has the form
name:tag, e.g.python:3.11-slim. If you omit the tag, Docker assumeslatest, which is a moving target. For anything you care about reproducing, always pin an explicit tag.
Cleaning Up
Docker accumulates stopped containers, old images, and dangling build layers surprisingly fast, and a full disk is one of the most common “Docker is broken” symptoms.
# Remove all stopped containers
docker container prune

# Remove all images not associated with at least one container
docker image prune -a

# The big hammer: remove all unused containers, networks, images, and build cache
docker system prune

# See what is eating your disk
docker system df
Data, Ports, and GPUs
Three practical topics come up almost immediately in data science work and are worth knowing from day one.
Getting Data In and Out
A container’s filesystem is ephemeral: when the container is removed, anything written inside it is gone. That is by design (containers should be disposable), but your datasets and model artifacts should not live and die with a container. There are two standard fixes:
- Bind mounts map a directory on your machine into the container. This is the workhorse for local development: your code and data stay on your laptop, and the container just sees them.
- Volumes are storage areas managed by Docker itself, better suited for data that belongs to the container’s lifecycle (like a database’s files) rather than files you edit directly.
# Mount the current directory into the container at /app
docker run -v "$(pwd)":/app <image-name>

# Mount a local data directory read-only
docker run -v /path/to/data:/data:ro <image-name>

# Create and use a named, Docker-managed volume
docker volume create model-artifacts
docker run -v model-artifacts:/artifacts <image-name>
A common pattern for experiments: bake the environment into the image, and bind-mount the code and data while iterating. You get reproducible dependencies without rebuilding the image on every edit.
Exposing Ports
Containers get their own network namespace, so a Jupyter server or model API listening inside a container is unreachable until you publish its port to the host with -p host-port:container-port:
# Run a Jupyter data science stack, publish the port, and mount your working directory
docker run --rm -p 8888:8888 -v "$(pwd)":/home/jovyan/work quay.io/jupyter/scipy-notebook
Open localhost:8888 in your browser and you are working in a fully containerized notebook environment, with your local files available under work/. The same -p flag is how you would expose a model served with FastAPI or Flask.
Using GPUs
Containers can use NVIDIA GPUs, but the GPU driver lives on the host while the CUDA libraries live in the image, and the NVIDIA Container Toolkit bridges the two. Once it is installed on the host, GPU access is a single flag:
# Verify the container can see your GPUs
docker run --rm --gpus all nvidia/cuda:12.4.1-base-ubuntu22.04 nvidia-smi

# Run a PyTorch training job with GPU access
docker run --rm --gpus all -v "$(pwd)":/app pytorch/pytorch python /app/train.py
This is a genuinely great fit for ML work: CUDA version mismatches are one of the most painful classes of environment problem, and shipping the CUDA runtime inside the image makes “which CUDA do you have installed?” mostly a non-question.
Common Pitfalls and Good Habits
A short list that covers most of the pain newcomers hit:
- Pin your versions.
FROM python:3.11-slimand pinned packages inrequirements.txt, notFROM python:latestand loose requirements. Unpinned images quietly change under you, which defeats the entire reproducibility purpose. - Order your Dockerfile for the cache. Dependencies first, code last, as in the worked example above. Slow rebuilds are almost always a layer-ordering problem.
- Use a
.dockerignore. Keep datasets, virtual environments, and.gitout of the build context. - Prefer slim base images.
python:3.11-slimis a fraction of the size of the full image; smaller images build, push, and pull faster. Multi-GB data science images are often mostly avoidable bloat. - Don’t store data in containers. Treat containers as disposable and keep data in mounts or volumes; you should be able to delete and recreate any container without losing anything.
- One process per container. Resist the urge to cram a database, an API, and a scheduler into one container; compose multiple containers instead (this is exactly what Docker Compose is for).
- Prune regularly.
docker system dfanddocker system prunebefore you start wondering where your disk went.
Where Docker Fits in an ML Workflow
Zooming back out, the reason this tool earns a place in a data scientist’s toolkit is that the same image can travel through the entire lifecycle:
- Reproducible experiments: a colleague (or you, six months from now) can rerun an analysis with the exact environment it was developed in.
- Training at scale: cloud training services (SageMaker, Vertex AI, Kubernetes jobs) generally take a container image as their unit of work; if your training job runs in Docker locally, it can run there too.
- Serving models: packaging a model with its inference server into an image is the de facto standard deployment path, whether that lands on Kubernetes or a serverless container platform.
- CI/CD: tests run inside the same image you deploy, closing the gap between “passes CI” and “works in production”.
The through-line is that the environment stops being an unwritten assumption in your head and becomes a version-controlled artifact next to your code. That is a very good trade for a single text file and a handful of commands.
Resources
- Docker official docs — the full set of resources including download instructions, reference API commands, and tutorials; the get started guide is the best first stop.
- Docker’s Python language guide — official walkthrough of containerizing a Python application, including linting and CI.
- Docker for Data Science DataCamp tutorial — a rundown of how Docker is useful for data science, along with practical code snippets and standard commands you may encounter.
- Docker Curriculum — a well-paced, hands-on tutorial that goes from zero to deploying multi-container applications.
- Dockerfile best practices — the official guide behind several of the good habits above, with more detail on layer caching and image size.
- Play with Docker — free browser-based Docker playground; useful for trying the commands in this post without installing anything.